
Why not add some international flair to dinner one night and grill up some sticky Korean BBQ chicken thighs. A favorite in our house and will likely to be one in your house. No doubt you will be licking your fingers clean with this recipe and will not have to worry about leftovers.
Korean BBQ Marinade
Let’s get started with the marinade. A sticky and sweet marinade that when grilled over some hot coals will absolutely leave you wanting more. Here are the ingredients you will need:
- serrano pepper (jalapeno works as well)
- soy sauce
- water
- seasme oil
- black pepper
- honey
- minced garlic
As you can see, this is a pretty basic of ingredients. I don’t think I am going out on a limb to say you should have most of it already in the house. Let’s get started on making the marinade.

Start off with the serrano pepper. You have two options here, seeds or no seeds. If you want the extra heat on the chicken leave all or some of the seeds in. If you prefer a little less heat, remove the seeds. After you have made your decision on the seeds vs no seeds, you can dice the pepper.
Before dicing the peppers, take all the other marinade ingredients and add them to a small pot, and let simmer for about 10 minutes on a low heat. After having diced the peppers, add them in for the remaining time. After about 10 minutes of simmering, you can take the ingredients, add them to a blend and puree them all. This should give us a nice smooth marinade. Put it off to the side for a brief moment, while you work on the chicken thighs.
Chicken Thighs Preparation
The chicken thighs will not require a ton of prep work. I used skinless and boneless thighs. If you have some excess skin or fat left on the thighs you can trim that off. I will at times trim off some extra skin but it is rare that I will trim off the fat. That will only benefit the thighs during the grilling process.

With the thighs ready, we can start to marinade them. Place your thighs in a resealable bag or container and then pour the marinade over the chicken thighs. Place them in the regfrigator and let the thighs marinate for about 4-5 hours. I will occasionally rotate the bag to ensure all the thighs are getting enough coverage of the marinade. On the tail end of the marinade you can get the grill going.
I used my Weber Kettle for this recipe. I got a chimney worth of charcoal going. That should easily be enough since this will be a pretty quick cook. When you lay out the charcoal, you can lay it out right down the center of the grill, as we are going to make these a direct heat cook. Ideally you are looking for a temperature of about 450° for this cook, it is going to be hot and fast.
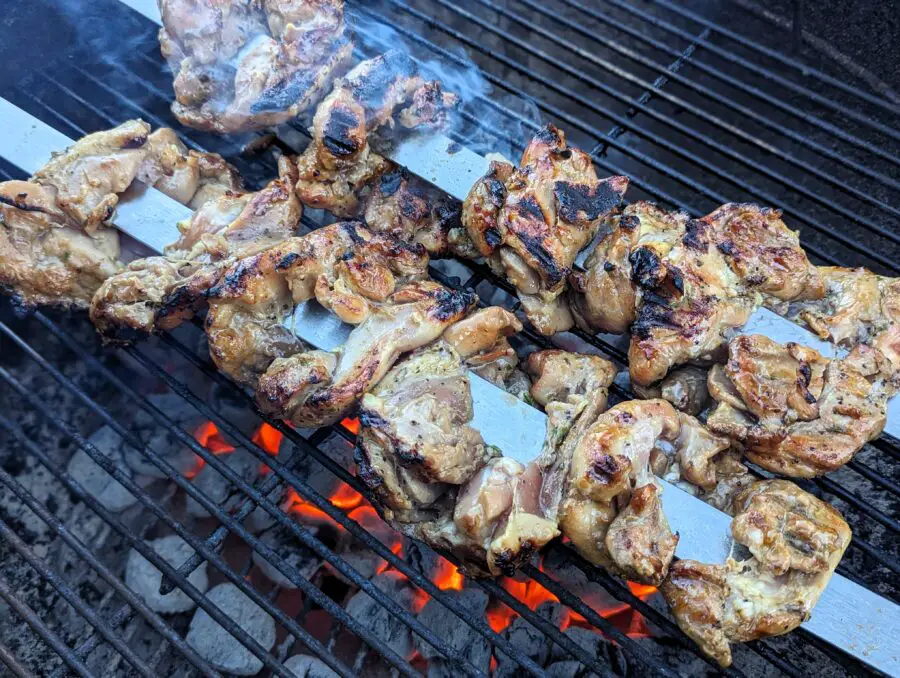
When making this chicken, I used flat metal skewers. They are easy to use and great to transmitting heat to the center of the chicken as we grill the thighs. They are definitely not required and in fact you can do this entire recipe by just cooking the chicken on the grate.
Once the marinade period is up, you can go ahead and get the chicken thighs on the grill.
Grilling Korean Chicken
Alright time to start grilling! This is going to relatively fast, so you will be devouring this chicken before you know it.
Go ahead and place the chicken on, over direct heat. The chicken thighs can handle it, since they have more fatty content than breasts do. Once you place them on, you will want to keep an eye on the IT of the chicken. Another reminder when referring to chicken thighs, while done at 165°, they can finish at a higher temperature, you can take them upwards of 175°. When it comes to chicken breasts, you definitely want to pull them at 165°, as they are more prone to drying out.
The ThermoPro TP20 is a great tool when it comes to recipes like the Korean BBQ Chicken Thighs.
You can grill these about 6-7 minutes on each side. Flip them just once after the 6-7 minutes. While grilling, close the lid as well. You will get some nice char on there, adding just a touch of crunch to the chicken. If you have reached the desire doneness and char to the thighs, when you get to 165°, you can pull them. If you want to keep them on a touch longer, you can. As mentioned above, you can safely keep them on upwards of 175°.
After removing them from the grill, cover them with some foil and let them rest for about 10-15 minutes. After that rest period you can serve these thighs.
Serving and Concluding Korean BBQ Chicken Thighs
We are ready to dive in now! Garish these Korean BBQ Chicken Thighs with some chopped green onions and/or some sesame seeds. If you are looking to fill these out with a bit more of a meal, you can serve them on a bed of rice, either a basmati or jasmine rice work with this chicken.

This is a finger licking good recipe, that you can easily do for a delicious mid-week dinner or spice things up and wow your guests next time you have a summer BBQ. Do not settle for the same old, go to recipes, while delicious in their own right, Korean BBQ Chicken Thighs will add a mouthwatering menu item not usually found for a summer BBQ.
Thanks for being here and checking out this Sticky Korean BBQ Chicken Thighs recipe. I hope you enjoy it! We always appreciate comments, 5 star recipe rating and social media shares. As always, keep that smoke rolling!
Here are variety of different chicken ideas both on the grill and smoker:
- Easy Grilled Chicken Strips
- Rotisserie Chicken Thighs
- Grilled Citrus Chicken
- Grilled Chicken Caesar Salad
- Smoked Chicken Legs
- Simple BBQ Chicken Thighs
- Smoked Pulled Chicken Breasts
This post contains affiliate links. If you use these links to buy something I may earn a commission.
Sticky Korean BBQ Chicken Thighs

A Finger licking good Korean BBQ chicken is a delightful way to enjoy a new chicken thigh recipe!
Ingredients
- 3 lbs. of boneless and skinless chicken thighs
- 1 serrano pepper (or jalapeno pepper)
- 1/2 cup soy sauce
- 1/4 cup of water
- 1/2 cup sesame oil
- 1 tsp of black pepper
- 1/3 cup of honey
- 1 tbsp. minced garlic
Instructions
- Start off with preparing the marinade
- Take the soy sauce, water, sesame oil, pepper, honey and minced garlic and add to a small pot and let simmer for 10-15 minutes.
- While starting the other ingredients in the pot, dice the pepper. If you want some extra spice, leave the seeds in, if you are looking for some less spice, remove all the seeds.
- After dicing the pepper, add it to the pot and let simmer for the remaining time, stir frequently to blend the ingredients.
- After allowing all the marinade ingredients the 10-15 minutes to simmer, pour into a blender and puree for about 30 seconds.
- When done prepping the marinade, you can prep the thighs. You can trim off any skin or excess fat. My recommendation is to not go crazy trimming the fat, it adds some great flavor.
- After trimming the thighs, add the thighs to a resealable bag or container and then pour the marinade on top.
- Let the chicken marinade for about 4-5 hours in the regfrigator
- As the marinade time wraps up you can start the grill. I used my Weber Kettle for this recipe
- Get a full chimney going and when ready, lay the charcoal out down the center, as we will grill the chicken over direct heat. You are looking for an grill temperature of about 450°.
- I used flat metal skewers, but if you wanted to lay these out on the grate you can do that as well.
- Once on the grill, close it up and grill the thighs on each side for about 7-8 minutes.
- After done, you can and reached a safe IT of 165°, you can pull the thighs and let them rest for about 10 minutes, covered with foil.
- After the rest period you can serve the chicken. You can serve as is or over a bed of rice if you are looking to fill out the meal.
Nutrition Information:
Yield: 6 Serving Size: 1Amount Per Serving: Calories: 717Total Fat: 50gSaturated Fat: 12gTrans Fat: 0gUnsaturated Fat: 37gCholesterol: 290mgSodium: 1563mgCarbohydrates: 17gFiber: 0gSugar: 15gProtein: 55g